I guess I fibbed about the rest of the story being in the next post, I threw in an update. By the end of our second journey we, as a family, had gotten the hang of camping in a trailer. It became fun, relaxing and something we wanted to do again soon. The first day was a whole different round of emotions. After the "water tank expansion lesson", we turned a two hour drive into about four hours. We stopped to find a few geocaches along the way, then wound our way down a gravel road for the last 20 miles of this drive until we got to our campground.
 After a nice meal and a bit of relaxing, hubby decides to tackle the refrigerator to get it to run on propane instead of 12V (our trailer battery). THAT TASK took a good hour, plus the pull knob kept yanking off. (Frustration #2 cuz remember, he expanded the water tank)
LESSON: WHEN PROPANE APPLIANCES HAVE NOT RUN ON PROPANE FOR SOME TIME, THE TUBING WILL HAVE FILLED WITH AIR. MOST AIR IS NOT FLAMMABLE THEREFORE TIME WILL BE NEED TO DRAW GAS FROM TANK.
After that fiasco, we all scope out the campground, of which we were one of two guests for the night, and to relax hubby. Once back from that short adventure, hubby sets to 'doctoring' the gaucho to get it back into working order. And no, a gaucho does not have to function (why does it even have that name, it's a couch)...except at night when it turns into a full-size bed, which at that moment would not have supported any weight. Soon into his 'operation' battery operated drill dies! (Frustration #3). Entire task must now be done by hand.
 This is the time when I decide to vacate the area with cousin and children to seek another geocache. It was also at this time that I changed toddlers diaper AND realized that I did not pack diapers. We had the three leftover in the diaper bag from the weekend camp trip (Frustration #4...oh really it was hubby's icing on his cake!)
Once back from that short adventure, hubby sets to 'doctoring' the gaucho to get it back into working order. And no, a gaucho does not have to function (why does it even have that name, it's a couch)...except at night when it turns into a full-size bed, which at that moment would not have supported any weight. Soon into his 'operation' battery operated drill dies! (Frustration #3). Entire task must now be done by hand.This is the time when I decide to vacate the area with cousin and children to seek another geocache. It was also at this time that I changed toddlers diaper AND realized that I did not pack diapers. We had the three leftover in the diaper bag from the weekend camp trip (Frustration #4...oh really it was hubby's icing on his cake!) LESSON: WHEN PACKING FOR MORE THAN A ONE-NIGHT STAY, WRITE A LIST AND REFER TO IT OFTEN, ESPECIALLY WHEN TRAVELLING WITH CHILDREN STILL IN DIAPERS. We quickly resolved that issue and left camp which was the best idea ever because two hours later we returned to camp to a relaxing hubby by the fire with his new magazine!! AND a reinforced gaucho that could now probably hold twice the weight of what it could hold before. I can now say it was quite the learning experience just in that first 24 hours. The next bit will be a lesson on the first step to disassembling your travel trailer.
We quickly resolved that issue and left camp which was the best idea ever because two hours later we returned to camp to a relaxing hubby by the fire with his new magazine!! AND a reinforced gaucho that could now probably hold twice the weight of what it could hold before. I can now say it was quite the learning experience just in that first 24 hours. The next bit will be a lesson on the first step to disassembling your travel trailer.Happy Travels!

 We have the whole back end framed and insulated. We used a rigid insulation the same thickness as the wood that has a foil looking stuff on one side (perhaps vapor barrier?). Today I need to fix a few odd spots then I can add one large vapor barrier, which will be a large piece of visqueen that we already have on hand. We do intend to complete this properly someday, but with are upcoming Yellowstone deadline, it will be done with a few non-life threatening shortcuts like this visqueen for example. The reason being that with the original construction, the pink insulation was in between all the wood and aluminum. Having used rigid insulation, that left the wood next to the aluminum.
 Did you know that RV water tanks are made from a type of plastic that will expand when it is overfilled with water from a hose that is jammed in the fill valve and turned on full blast? No really...this is true...at least in our case. Towards the front of our trailer, underneath the gaucho that turns into a full-size bed, our 50 gal (expandable?) water tank sits peacefully. This tank fills on the right side, is pumped out on the left side and up to the kitchen faucet and/or bathroom faucet or toilet.
 When you park a trailer next to a steeper than average curb, the difference in water level from left to right is pretty close to six inches, meaning that the left side will become a pocket of air as the right side is forced in with water. Once that pocket of air is created, there is no more room for the water to go but to be forced back out (as it was 'pressure washing' the sidewalk) or through to the kitchen sink (as it was also squirting out of). If you are fast enough, you can run inside the trailer to see the water squirting from said kitchen sink AND watch that back gaucho cushion lower back down as pressure deflates from the (now expandable?) plastic 50 gal. water tank, as my husband claimed to witness. This occurred at 9 A.M. on the day of our departure scheduled with my mom in her camper van at 10 A.M.
 LESSON: FILL TRAVEL TRAILER WATER TANK WHEN IT IS PARKED ON LEVEL GROUND.
 Where we stayed was so foresty and green and beatiful, that I had to include our trailers little patch of foresty, green sweetness!
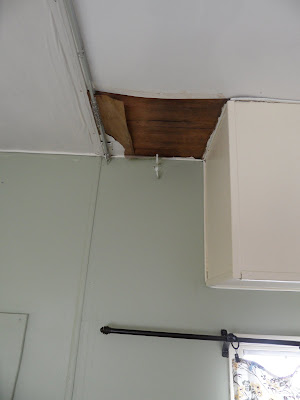
 Our first outing with our little Layton took us on an overnight stay just 20.09 miles from home to a military resort at a nearby lake. Sounds simple right? The week prior to this one night outing (which went smoothly, therefore I will not touch on) was a wee bit rough, so we thought, until we experienced our second journey (which will be a whole other blog post). Five days prior to travel date, we take the tarp off so that we can deep clean it. Did we check the weather forecast?? NOOOO!! Should we have?? YEEESS!! Assuming the week would be sunny and clear, mid-week we get a quick overnight rain storm that dissipates by mid-morning, leaving POOLS of water on top of the camp trailer. Well, I thought, this can't be good. Sure enough, I check the interior and there is water dripping in this whole area...